Managing the Homepage
The home (main) page is a great way to showcase your content.
The main page will load the very first when users log in, instead of the asset feed, that is, it will form the first impression of your content.
The main page is a set of collections selected by you and arranged according to a given scheme.
The appearance of the main page depends on its settings, and this article will help you create a beautiful main page.
Also, the main page can be used for quick navigation to the most relevant collections — when you click on the preview of the collection on the main page, you go to the asset of this collection.
![]() If the main one is not configured, when logging in to your workspace / restoring the session, users immediately get to the asset feed.
If the main one is not configured, when logging in to your workspace / restoring the session, users immediately get to the asset feed.
The main page consists of different types of blocks, which in turn contain different collections. There are 3 types of blocks:
Type 1 — represents a block with a single collection. You can create only one block of the first type.
Type 2 — blocks of the second type are rows of selected collections. There can be two rows of three collections in each. There cannot be more than 6 blocks of this type.
Type 3 is a collection feed. It can be scrolled left-right to view all collections in the feed. The number of collections in the feed is unlimited and the number of feeds is also unlimited.
The user on the main page sees only blocks with collections available to him, so if you want the main page to be accessible to unauthorized users, use "Public" collections to configure the main page.
If you want the main page to be accessible only to authorized users, use the "Common" collections to configure the main page.
To set up the main page, you need to do the following:
In the administrative panel, go to Main_Page > Content blocks.

After creating your workspace, in the administrative panel you will see pre-configured blocks of different types. Although they are displayed as active, they need to be adjusted for the main page to start functioning.
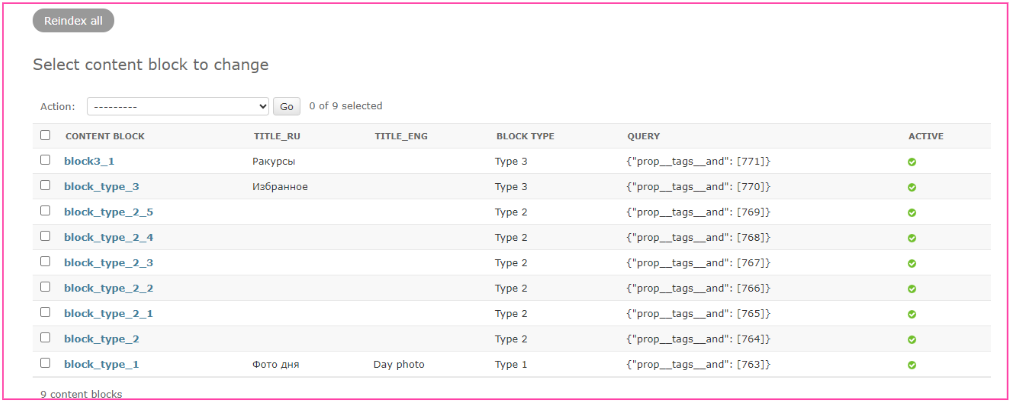
Click on the Add content block button to add a new block or click on an existing block to edit it.
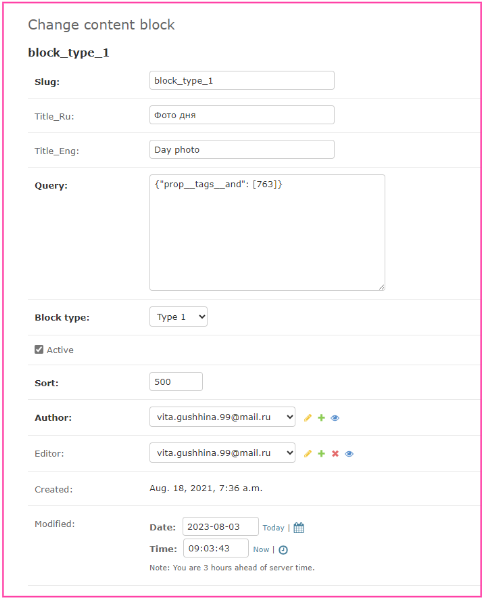
Slug is the system name. It is not displayed on the main page (the name in the interface is set via the Title fields), it is necessary to check the uniqueness of newly created blocks.
Title_Eng — this field is used to set the name for the 1st and 3rd types of blocks displayed in the user interface in English.
To configure the names of the type 2 blocks, go to the Options section of the administrative panel and change the value of the following properties:

To fill in the Query field:
1. Go to the Picvario interface.
2. Select the collection you want to put in the block.
3. Set the tag for the selected collection (we recommend using the tag "mp1" for the collection of block type 1, for collections of block type 2 "mp2", "mp2_1" and so on, for collections of block type 3 "mp3", "mp3_1" and so on).
For a type 2 block, you need to put a separate tag on each of the 6 collections. For a type 3 block (feed) - one tag for all collections in the feed.
4. Click on the tag so that the desired collection appears in the collection feed.
5. Click on the filter panel , scroll down, click on the Get a code.
6. Go back to the admin panel and paste the received code into the Query field.
Block type — the type of block to be created, choose one of three.
Active — a switch that allows you to turn on and off the display of the block.
Sort is a parameter that allows sorting the order of collections for blocks of types 2 and 3.
For the second type of blocks, sorting affects the order of the collections inside the 6 available cells. Since the second block is created according to the scheme: one block = one collection.
For blocks of the third type, sorting affects the arrangement of the feeds among themselves. Let's say you have created several blocks of the third type, with the help of sorting you can specify which feed will be located above and which below.
After filling in — click Save.
Example of adding an extra block of type 3
1. Go to the Content blocks section.
2. In the upper right corner, click the Add content block button.
2. In the Slug field, type block_type3_1.
3. Type the block name in the Title_Eng field.
4. Get the code to fill in the Query field (instructions above).
5. Select Type 3 from the Block type menu.
6. Check the Active box.
7. Click Save.
Related Articles
Managing Organisations
Picvario users can be arranged not only into groups but also into organizations. How to create an organization In Picvario’s interface Go to the User Profile – System’s settings – User management – Organizations Click “Add organization” at the right ...Managing Multi-Language Properties
Read about multi-language properties here. The fields title, description, copyright, usage rights are multi-language by default. To disable this property for the above mentioned fields, open the administrator panel and do the following: Go to Home > ...Managing Access to Collections
Types of collections The system can contain the following types of collections: Public Collection: a collection available to both logged-in and anonymous users. Common collection: a collection available to all logged-in users. Private collection: a ...Picvario: Managing Users
You can add new users both through the Picvario interface and admin panel. Manage access rules is only possible in the admin panel. Creating a new user in the Picvario interface In the Picvario interface go to User profile - System settings — User ...Managing User Groups
Create groups of users if you need to allocate different sets of rights to different departments, teams or divisions within your organization. This also allows managing access to certain assets within your archives. You can add groups both through ...